
While setting up your Raspberry is great and all and having multiple settings defined maybe by the software developer some custom code. You name it and the Raspberry can handle and do it. Now from a system administrators it can very hard to manage these in a good way think about security for example. But one topic of discussion as well was imaging.
What is imagining you ask, good question. Imaging is basically making a copy of some hard drive or storage space and being able to paste that on another hard drive or storage space. It is a technique used with my job description to allow ease of deployment of hardware and software to make sure all machines for example are the same.
This all depends on one machine that you’ll use as the what I call “GOLDEN IMAGE”. This is the image that you create from the machine that you configure just the way you like it, but keeping in mind it will be deployed onto other machines.
Normally I personally like to use CloneZilla as my go to imaging solution. It is easy to use and have great safe checks for deployment and making of the “GOLDEN IMAGE”. However in the case of the Raspberry Pi it was just not user friendly enough to use for the purpose of making an image.
While seeking and googling my way through the best answer I came across HDD Raw Copy. Now this is a great solution to the problem. Making a raw copy of the SD Card of the Raspberry Pi saving it as a .img file is just great. Even having a portable file so that you do not require an installation.
The only difference really is that CloneZilla requires at least to be user friendly to be connected to the device that it is supposed to be imaging. HDD Raw Copy works a bit differently in that it requires a separate computer to be used in which you just plug in your SD Card or any other storage device and make the image from there.
So how does it work. It starts by downloading and installing HDD Raw Copy from the official website which will be linked under here. You are install it or download the portable file but in either case when you are done and wanting to make the image you need to run the program under Administrator rights.
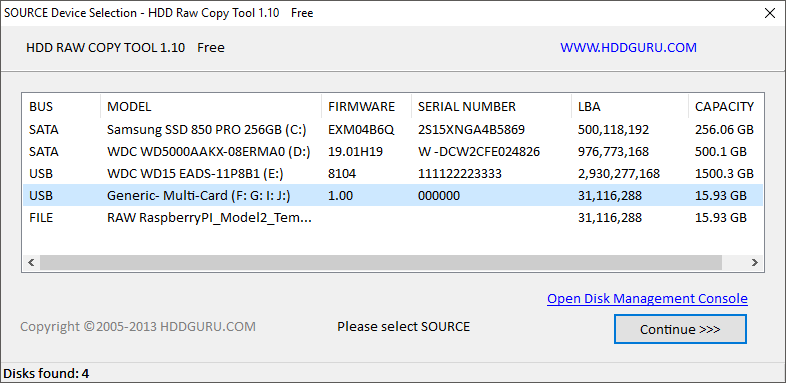
To make an image you select the USB device that you wish to image. See the screenshot below for an example. Highlighted in Blue is the device which I want to image.
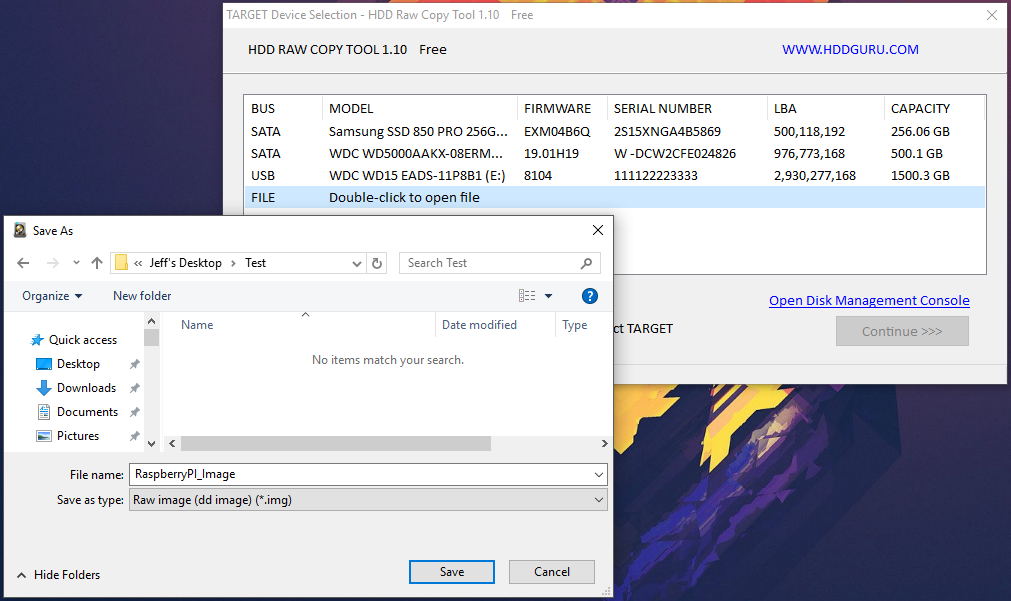
Then you press the Continue >>> button and move onto the target. From here you could if your computer was more fancy then mine have a second SD Card inserted and directly paste it to it. However I am saving the image as a file to store and use later. So I double click the FILE option and input my file name.
Keep in mind that you can use the Save as Type option if you would like a compressed image file or a raw image file. Just the compressed option it will only save what is used instead of the total amount of SD Card space. It’s your choice.
After that press Continue again and press Start and basically you now wait which depending on your SD Card or files can take a few minutes. Now to deploy and image to an SD Card you reverse the TARGET and SOURCE. The SOURCE (The first window) you will now browse for the image you created before and the TARGET will be the empty SD Card on which you want to deploy the image.
For me it is a great tool and worked very well in ease of deployment with Raspberry PI’s and maybe just maybe it will help you too.